Corn Tortillas made with Yellow cornmeal flour

>> Thursday, July 30, 2009

homemade corn tortillas,corn tortillas pragueOne of my most vivid and fondest childhood memories is being sent to the local tortilleria everyday, sometimes twice, for our daily kilo or so of fresh corn tortillas for our meals. The lines where always long, but just being there and smelling the tortilla dough, feeling the heat and smelling the tortillas as they came off piping hot from the conveyor belt was a great sensory experience. I always had to eat at least one on the walk back home, I just loved it and miss it terribly.


Tortillas are Mexican flat breads that are eaten with almost every meal, one of the most important part of Mexican cuisine. The word comes from Spanish, torta which means a circular cake. In Castilian Spanish and in Spain a tortilla is a thick and round egg omelet, quite different but still delicious. Tortillas have a long history in Mexico and some central American countries, some legends say they date as far back as 10 000 BC or older. There are 2 kinds, corn which is made from masa harina, a whitish cornmeal dough made by soaking dried corn kernels in water and lime to soften them and remove the skin. Then ground to form the masa or dough, made into balls then patted to a flat round bread that was then cooked. The second tortilla type is flour made from wheat flour. I know that flour tortillas aren't as old as the corn, but not really sure when they were first introduced, (more to come on flour tortillas.). Tortillas are used to make tacos, enchiladas, quesadillas, tostadas, chips, and Burritos (made with flour tortillas) and some desserts . So you can see why a Mexican kitchen without tortillas would seem like an incomplete kitchen.

Busy and modern times had ended the traditional ways of preparing your own and nowadays families use commercially prepared tortillas. In the US as in Mexico you can find good commercially made corn and flour tortillas virtually anywhere, but unfortunately in Europe there aren't any tortilla factories that I'm aware of, although I have come across the flour tortilla packages which I think taste awful. I'm almost certain that the "Mexican" restaurants here make their own corn using reconstituted masa harina. So again I have had to substitute and make do with available ingredients, which means no masa harina. Today's recipe is made with yellow cornmeal flour, my substitute to the traditional masa harina. (A recipe for my homemade flour tortillas will be added soon).

corn tortilla ingredients Your Ingredients:
1 1/2 cups(170 grams) fine yellow corn flour
1 cup (110 grams) white wheat flour*
1/2 tsp. (2 ml) salt
2 TBSP. ( 30 ml) vegetable oil
3/4 cup (177 ml) warm water

skillet /griddle
rolling pin or tortilla press
2 small sandwich bag / or 2 waxed paper sheets
* the wheat flour helps in keeping the fine corn flour together and easier to work with*

1. In a bowl combine both flours and salt, until well combined. Next add a little of the water and the vegetable oil. Start kneading and combining the dough, gradually adding the rest of the water until the dough stops sticking to your hands. You may need to use either more flour or water to get the balance right. You want a smooth dough that isn't too dry.
2. Warm the skillet/griddle over medium heat. Separate the dough into small balls,golf ball sized, you should get about 10-12 balls. Take one ball and cover the rest with a kitchen towel, to keep them moist.
If the balls start to dry out as you are rolling the others out, add a drop or two of water to re moisten.
3. Take either your 2 plastic bags or waxed paper and place a dough ball between them. If you have a tortilla press just push down to flatten, If you don't have a press and are using the rolling pin roll out the ball to a 1/8 inch.
cooking corn tortillas,expat corn tortillas
4. Peel the tortilla away from the plastic/waxed paper and put on the hot skillet for 2 minutes on each side. You will see blisters start to form as it cooks. Repeat steps 2-4 until you have finished with all the dough. You can either stack the tortillas up to use right away, or let them cool down a bit and put in a sealed container or bag to store in the refrigerator and use later.

yellow cornmeal tortillas
The tortillas will keep in the refrigerator for a few days, then begin to dry out( which you can then fry/bake and use as chips.) The tortillas can be reheated on a warm skillet/griddle, directly on the flame(gas stove) or in a microwave.

Read more...

Green salsa made with green banana peppers

>> Friday, July 24, 2009

salsa verde banana peppersSpicy green salsa made with green banana peppers. Green salsas or Salsa verde are made using Tomatillos ( a small green tomato that's wrapped in a husk) , fresh green chili (either fresh Jalapenos or Seranos), cilantro, onion. This salsa is a substitute for the traditional salsa verde, because I have never seen tomatillos here and fresh spicy green chilies aren't always available, but these green banana peppers are available year round.
substitute for tomatillos

Your ingredients:
2 large green banana peppers (aka wax peppers/ slovak peppers)
1 hot red/green pepper ( I'm using a Holland/Dutch pepper )
1/4 of a medium onion
2 garlic cloves
1 medium tomato
a handful of cilantro
1/2 tsp. / 2 ml of salt
1/4 tsp. / 1 ml of black pepper
1 tsp. / 5 ml Oregano
1 1/2 tsp. / 7 ml cummin seeds, then ground

1. Cut the stems off the peppers and remove the seeds off the banana peppers, leave the seeds on the hot pepper. In a pot add the peppers,onion,garlic and tomato add enough water to cover. Boil these ingredients until the peppers have become tender, about 10-15 minutes. Strain the ingredients.
2. In a blender all the boiled ingredients, cilantro and spices, and blend until smooth sauce. Taste for salt. Allow to cool down to room temperature or store in refrigerator until ready to use.

It may not taste exactly like traditional salsa verde but it tastes really good and makes a great substitute. You can use this salsa on top of pretty much any Mexican food you like, this is going on my sopes tonight, yummy!

Read more...

Beef sopes topped with avocado and green salsa

Beef sopes topped with green salsa, served with refried beans, grilled banana peppers and small green onions. Mexican Sopes may not be as common as a taco but if you have a chance to try them you definitely should. They are antojitos or small snacks/meals sometimes eaten as an appetizer , my Mom and now I in my house served them as a main meal. These is a quick, delicious meal that doesn't have to be too fattening. Please look at an older post here for the sopes recipe to start.
homemade sopesYour ingredients:
ready made sopes (I'm using 6 for 2 adults)

300 grams / .660 lbs of beef chopped into bite sizes
1 tsp /5 ml (of each) cumin,garlic powder
1/2 tsp/ 2 ml (of each) salt and black pepper
1 tbsp /15 ml of vegetable or olive oil
1 cup /225 grams refried beans

Toppings/garnishes:
green salsa (or salsa of your choice)
sour cream (optional)
shredded lettuce (optional)
avocado slices (optional)
grated fresh Mexican cheese / feta as a substitute

Ingredients to serve on the side for a complete meal:
refried beans and or Mexican rice
grilled banana peppers
grilled small green onions

1. The first thing is to make the sopes, I've made the sopes the day before and kept them in the refrigerator, if you've done the same warm them up a few minutes over a hot skillet before you used them. Either way have the sopes ready to go. In a pan add the oil, meat and spices and cook until soft. The spices are simple because the taste will come from the salsa and other garnishes.
2.While the meat is cooking start preparing or cutting the garnishes and slice the banana peppers in half and remove seeds to grill them. Add a little oil to a skillet/griddle / grill and cook the peppers and green onions until tender.
3. While the meat and sides are cooking you can prepare the sopes. Now some people, will deep fry the sopes then start topping them. I prefer not to because I'm not a fan of fried food and it adds a lot of calories. Have the meat and the 1 cup/225 grams of refried beans ready.
4. Take one sope and smear a thin layer of beans on top, then add a little meat, next you can start piling on the garnishes. This particular day I only wanted salsa and avocados, but you top them with the garnishes of your choice. Add your side dishes to the plate and they're ready to server. Simple and delicious!

beef sopes
*you can find the recipes for beans,salsa and sopes in the archives or click the highlighted linked words.*

Read more...

Japanese curry

>> Friday, July 17, 2009

history japanese curryCurry ( karē ) was introduced to Japan sometime during 1869-1913. At a time when Japan was modernizing and western culture was being taken in by it's people. Japanese curry is thicker than Indian and Thai, though spice levels can range from mild to hot it can have a bit of a sweeter taste. There are several variations curry with rice, curry on Udon(buckwheat) noodles or with a breaded pork cutlet, all of which are very good. I've only used the instant curry blocks, and have never seen Japanese curry powder, ( and since it calls for some sort of roux and sweetener I have never experimented with making it from scratch. ) From what I have found online these instant blocks seem to be the most popular way of preparing curry in Japan. If you ever come across the packages that have apple added to them, you have to try it. It's such a unique taste, still a little bit spicy with a touch of sweetness.
curry blockToday we'll be making curry rice. The packages all have simple instructions, which consists of using chopped onion,diced carrots and potatoes,meat, water and the block of curry. Basically with a little oil fry the chicken/meat then add the veggies and fry until they begin to soften. Add the curry block and water, stir until the block has dissolved, simmer a bit an serve with rice. Super easy and fast, you'll spend more time chopping the veggies :)


chicken curry japan
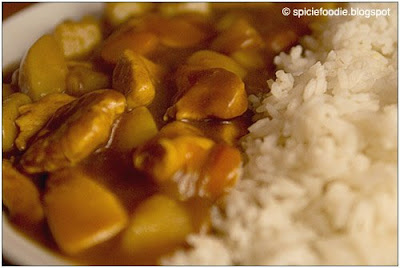
Japanese curry was the first curry I ever tried, believe me it's something you'll craved all the time. It's also a good curry for the first -timer to try , not too spicy but still fragrant and complex.


Read more...

Sunday night roasted juicy and crispy herb chicken

>> Tuesday, July 14, 2009

juicy roasted chickenEvery body(well not vegans and vegetarians) likes chicken it seems to stand on neutral ground. Is that why everything is described as tasting like chicken? The current species we know today is a hybrid of the red and grey fowl that were raised thousands of years ago in the Indian subcontinent. I found conflicting information as to who were the first people to domesticate chicken, some say India others China. Chicken meat is inexpensive and one of the most used meats in the world. Did you know that there are more chickens in the world than any other bird?

This recipe uses herbs as the main ingredient giving it a lot of flavor, and it's both juicy and crispy. Mine is always served with fresh baked dinner rolls and available vegetables. The measurements depend on how big the bird is, you'll need enough to coat the entire bird well on both sides. I am using a 1.5 kilo or 3.3 lb chicken.

Your Ingredients:
1 roasting chicken
1 large baking pan
sharp knife
1/2 tsp (2 ml) salt & pepper, of each
1 tsp (5 ml) garlic powder
1 tsp (5 ml) paprika powder
1 tsp (5 ml) of each dried basil, oregano, thyme , rosemary,
1/2 tsp (2 ml) dried parsley
1 chicken bouillon cube ( look for a low sodium and with out MSG )
1 cup ( 250 ml) warm water , to dilute bouillon

1. preheat the oven to 176˚c /350˚ F, combine all the spices, prepare the bouillon, clean and prepare the chicken.
2. The first step is the trick to getting the spices to give the chicken a lot of the flavor. Breast side up, either with a knife or using your hand ( if they are small enough) you need to separate the skin from the breasts. With either your hand or a couple of fingers rug some of the spice mixture into both the chicken breast, and then rub spice mixture on top directly on the skin. Next try to do the same on the drumsticks, make a small incision for a couple of fingers and rub as well and as much spices underneath the skin. Use the remaining spice mixture to rub and cover the entire chicken top and bottom. Cross the drumsticks then put it in the roasting pan.
3. Dilute the bouillon in the water making sure it breaks up. Pour only a quarter of the liquid into the pan. Reserve the rest of the bouillon, you will add it gradually as the chicken cooks and the liquid in the pan begins to absorb. Check the chicken every 30 minutes and don't let the bouillon dry out, keep adding it. I cooked this chicken for 2 hours ( cooking time depends on weight, higher weight = longer cooking time. Please double check proper cooking times for the weight you use). I check on it every 30 minutes, the fat will begin to melt off and collect in the pan. Spoon up that liquid/fat mixture and pour it over the top of the chicken. Half way through the cooking time, flip the chicken over and cook for 30 minutes ( pour some of the collected liquid from the pan again), after 30 minutes flip again then finish roasting breast side up again.

juicy crispy roasted chicken
Ready to serve!, it's one of the easiest dinners to make and doesn't require to much attention, perfect if you have laundry or like me have ironing to do ( I hate ironing ). Roasted chicken goes well with green beans and mash potatoes (mine are the instant kind, I can't make them from scratch they always turn out bad. Why is it that I have no problem with other more complicated dishes but this I just can't. Anyone have a good recipe? ) Or serve with your favorite veggies. Don't forget the fresh baked rolls, they are yummy.


Read more...

Homemade dinner rolls, soft and warm

>> Monday, July 13, 2009


Homemade dinner rolls, soft, fluffy, moist , warm and golden dinner rolls.

Your Ingredients:
2 cups of white flour
1 egg
1/2 cup milk, lukewarm
1/4 cup water
fresh yeast 1/2 cake of fresh yeast or 2 1/4 tsp dry
1 tsp. (5 ml) sugar
1 tsp. (5 ml) salt
1 tbsp. (15 ml ) butter/vegetable shortening
extra flour for kneading

1. In a small bowl combine the lukewarm milk, sugar and yeast then set aside. Make sure that the milk is not hot otherwise you will kill the yeast and the rolls won't rise, (yup speaking from experience).
2. In a large bowl measure the flour and form a well in the center, add the salt, butter and egg. By now you'll see the yeast has started foam and if so you'll add it to the well in the flour. Either in an electric mixer or with your hands, begin combining the ingredients to make the dough. On a clean floured surface keep kneading until you form a smooth elastic dough, about 10 minutes, slowly adding a little extra flour if needed. Knead for a few more minutes to get air into the dough.
3. Divide the dough into 6 pieces. Use the palm of your hand and place on top of 1 piece turning in circles to form ball. Have fun with it make the shapes you like, I made snails rolls. As each piece is finished set it on a baking sheet. Once they have all been shaped you can either add an egg wash - a lightly beaten egg is used to brush on top the dough for a shiny surface, Or simply brush with milk - this helps with browning of the surface, or just leave as is. Set baking dish aside to allow the yeast to rise the dough.
4. Once the rolls have doubled in size, anywhere from 30-50 minutes, you are ready to bake. Preheat oven to 200˚C / 375˚ F , wait 10 minutes to warm up then put the baking sheet in the oven. The rolls will bake in about 10- 15 minutes.

Let the rolls cool down a bit before you serve. I love this simple recipe, the way the kitchen smells when their baking and of course fresh baked rolls are so much better than prepackaged ones.

I can never wait until they have cooled down, have to cut a piece off right away. Yum!

Read more...

Malaysian Hoi Sin Sauce with a twist

>> Thursday, July 9, 2009

pork with hoisin sauce
Malaysian Hoi Sin Sauce is a dark sweet sauce that is used for barbecued meats. In general I can say that I don't like eating or buying prepackaged meals, it's usually a mistake that I end up hating. But there are few exceptions like this one because the sauce mixture is good quality and taste. I will let the company describe it in their own words.

"Brahim's Malaysian Hoi Sin Sauce - A rich, dark sauce flavoured with sesame oil, chillies and garlic, ideal to stir through or to use as a marinade."
The package has clear instructions on how to use it but I like to prepare it a bit differently. I use about 1 lb. or 400 grams of pork sliced into thin strips, a little more than 1/2 lb. (300 grams) of cooked or steamed broccoli , some slices of hot red chili, a little garlic powder,the bag of Hoi sin sauce, and steamed white rice to serve with.

red chili pepperFirst I prepare my ingredients , and in a pan with a little oil I fry the pork , then add the garlic powder and chili pepper. Once the pork is cooked the sauce can be added. My husband loves the sauce just like this, but for me it's a bit sweet so I sometimes add a little water or use less of the sauce. This balances the sweetness a bit, and you also get the spiciness from the chili. Definitely worth trying.

Read more...

Lemon Mint Ice Tea - refreshing summer drink

>> Wednesday, July 8, 2009

ice tea home made

On a hot summer day few things are as refreshing as a cold iced tea. My favorite "iced tea" to make includes fresh lemon, fresh mint leaves, honey and black tea ~ Honey Lemon Mint Tea. It's cold, thirst quenching, all natural, fresh and nutritious. We've all heard the long list of health benefits of drinking tea, and we of course need water to survive. Lemon are loaded with vitamin c which is vital for your immune system. Peppermint is an excellent source of manganese, vitamin C and vitamin A. Honey since ancient times has been used in medicine and in food. Both lemons and honey are used extensively in cosmetics for their anti-bacterial and anti-fungal properties, they don't just smell nice. Well the benefits of these 4 ingredients goes on and on.

Your ingredients:
4 black tea bags
2 liters of water (8 cups)
juice of 2 fresh lemon juice
1 lemon sliced
1 handful fresh mint leaves , extra for garnish
honey to taste
ice cubes

lemon honey mint tea
1. bring the water to a boil , then add the tea bags and simmer for 5 minutes. Turn heat off and let it rest for 20 minutes or until the water is lukewarm.
2. Prepare your pitcher add ice some ice cubes. Add the lemon juice and some honey to the tea, mix well and for about 5 minutes to get the honey to melt. Remove the tea bags, and pour tea into pitcher. You can either put the pitcher in the refrigerator or get ready to serve. Right before you serve add lemon slices and the mint, let it sit for a couple of minutes.
3. When you serve pour the tea over ice cubes if you want, with a slice of lemon and some mint leaves.

I make sure that my tea is cold enough so that I don't have to add extra ice cubes when I serve my glass, that's why you don't see ice in the photo. Also I am not giving you an actual measurement for honey, because I use very little if any sweetener in my drinks.
Enjoy~

Read more...

Garam Masala ~ Indian curry spice

garam masala homemadeSpices are the most important ingredient in Indian cuisine. One of those spices or rather spice mixture you'll come across most often in Indian recipes is Garam Masala. I've come across so many variations that I get the feeling that every family or region has their own unique recipe. These days you can find ready made mixtures in virtually any store. But the commercially prepared doesn't even come close to the aromatic freshly ground home made Garam Masala. Ground or crushed spices don't have the same aromas as their whole counterparts, ground spices have a shorter shelf life than whole and generally whole spices are cheaper. Also some of the lower quality curry brands will substitute cheaper spices for the more expensive ones like cardamom or nutmeg.

This combination of 9 spices is what has worked best for me, and since it doesn't include chili it works well for people that don't want spicy curries because you can decide how much "kick" you want it to have later.

home made curry powder
Spice you'll need:
2 TBS. coriander seeds
4 TBS. cumin seed
1 TBS. black peppercorns
1 tsp. fennel seeds
1 tsp. whole cloves
2 cinnamon sticks or 1 TBS of ground cinnamon
1/2 tsp. nutmeg
2 tsp. green cardamom seed(measured after you remove the shell)
2 bay leaves

You will also need a pan, a mortar and pestle or coffee bean grinder or spice grinder.

1. Warm the pan on the stove over medium low heat, then add all of your whole spices to dry roast for a couple of minutes. Just until the spices start to release their fragrance be careful not to burn them.
2. Then you will transfer the spices from the pan to a dish to cool off for a few minutes. Now you can peel the cardamom and throw out the shells.

mortar and pestle curry3. Add all of your spices to your mortar or coffee/spice grinder. I like to use a mortar and pestle to easily control how fine I want the mixture. Now time to use those muscles and start grinding the spices.

You've just made your first Garam Masala and by now your kitchen and house will come alive with all the wonderful smells. The slight sweetness from the cinnamon, the spiciness of the pepper and cloves, a hint of citrus from the coriander seeds, a little lemony scent from the cardamom. Go ahead taste it, now tell me that doesn't taste 100 times better than the prepackaged stuff?, not even a comparison.

You'll get hooked on making your own mixture, once you see the difference in your curries. You can double , triple or quadruple this recipe to have extra to store ~ just remember the ground spices will start to loose their freshness. Lots of curry recipes coming ......

aromatic fragrant spice mixtures

Read more...

Cooking Gorditas in Europe

>> Tuesday, July 7, 2009

As promised here is a Gordita recipe, the filling used is chicken , served with a side of refried beans and a spicy red salsa. This recipe uses only my local European ingredients, substituting everything from the gordita dough to the peppers and cheese.

For the filling you need:
2 boiled chicken breast (or 2 leg quarters)
1 large tomato,chopped
1/4 onion, chopped
1 banana pepper (yellow wax/Hungarian pepper) chopped
2 garlic cloves, minced
1/2 teaspoon (2 ml) salt and ground black pepper,oregano, ground cummin,
1 teaspoon(5ml) of paprika
1 Tablespoon (15 ml ) oil ,any

1. The chicken must be boiled first, let it cool off and reserve some of the stock. Then shred it and put it aside. While the chicken is cooking you can prepare the salsa.
Easy Salsa Roja:
3 tomatoes
1 chile de arbol or any large hot chili
1/4 of an onion
2 garlic cloves
1 handful of fresh cilantro
salt,black pepper, a pinch of paprika

Put all the ingredients in a blender, and process until it's well combined. Pour into serving dish and set aside.
2. Next prepare the vegetables and spices for the chicken filling.
3. Add your oil to a pan once it's warm add all the vegetables then the chicken and last the spices. Stir to combine all of the ingredients. Cook until the vegetables become soft, about 10-15 minutes. (If the meat and veggies are too dry or begin to stick to the pan you can add a big spoon or two of the reserved stock, this way you don't need more oil- adds more flavour -and keeps the calories lower.)
In the mean time you can prepare the toppings and warm up your beans.
Toppings/Garnishes:
Sour cream
grated cheese ( I used grated feta, Edam is also good)
finely sliced iceberg lettuce
chopped radishes
These toppings can be optional, the only one I strongly suggest is the cheese because it adds another flavour to the gorditas.
Once the salsa,toppings and chicken are done you can warm up the gorditas. Do this either on a griddle/skillet or in the microwave.
4. One at a time start to fill the gorditas with the chicken. If using all the garnishes do this next, or you can let everyone add the toppings themselves, as well as the salsa. Ready to serve.

Even being so far from home I can still have a taste of home, makes me happy. Buen Provecho!

*remember to check the archives for both the refried beans and gordita "patties" recipe.*

Read more...

Gorditas and Sopes a Mexican treat

>> Monday, July 6, 2009

Sopes and Gorditas, no I'm not talking about Taco Bell Gorditas. These small, round and thick disks are made from masa( a whitish dough made from ground corn, water and lime), and then cooked on a comal (griddle or skillet). The word gorditas is also used as a term of endearment for a curvy girls :) and sopes as far as I know just means these little goodies.


They are both made with the same simple ingredients of flour,water,fat and baking powder. The only differnce between them is that a gordita is sliced, like a pita, to make a pocket and stuff. The sope is taking the dough shaping it to a thick circle and has the edges pinched to make a rim like a pizza or a pie, with the ingredients put on top. Now that I think about it these same ingredients are used to make Tamales and corn tortillas (minus the baking powder).

If you are lucky enough to have access to fresh masa take advantage of it, or maybe your local grocery store carries Mexican products and you can buy the corn flour called Maseca. I don't have access to either so I've learned to substitute yellow cornmeal, with pretty good results. This superfine flour is from my local health food store and comes in 1 kilo bags ( 2.2 lbs) .


ingredients & utensils:
1 1/2 cups of super fine yellow conrmeal
1 cup white flour
1/2 teaspoon salt
1 teaspoon baking powder
2 Tablespoons vegetable oil
1 cup lukewarm water
rolling pin
griddle /skillet
2 small plastic sandwich bag

1. Under medium heat start heating the griddle/skillet. In a bowl you want to combine the flours (please note if using Maseca you don't need the white flour). Then add your other dry ingredients, mix until well combined.
2. Add your oil and about half of your water. Use your hands to combine and knead all the ingredients, adding the remaining water slowly until you have a moist dough that will feel a bit spongy.

3. Once your dough feels soft you'll need to start shaping it into small 1 inc/ 2.5 cm balls. This recipe yields 6 to 7 Sopes or Gorditas.
4. Take one of the plastic bag and place it on your counter or cutting board, then place one ball in center,place your other plastic bag on top the ball and with the palm of your hand push down. Using the rolling pin make thick patties that are about 3 inches/ 7.6 cm wide and about 1/4 inch or .6 cm thick.
5. Peel the top plastic bag and lift the pattie onto your palm peel the other plastic and place on the hot griddle/skillet.
6. Both sopes and gorditas will need to cook on each side for about 4 minutes.

Then let them cool off just enough so you don't burn your fingers, to give them their final shapes.

For the sope pinch into the sides making a rim all around,see photo, and for the gorditas take a sharp knife and slice along the side to make a pocket.

Next I'll have a recipe for a gorditas dinner, don't miss it.

Read more...

Spicy lentils with cornbread

spicy lentils,cornbreadWhen people hear lentils the general reaction is, eeww lentils. But they don't have to be, all they need are some simple spices and you can turn lentils into a healthy, little spicy , delicious and nutritious meal. Lentils are very good for you, they are one of the highest sources of protein, so they are very important for vegetarians and people that can't afford to eat meat, that's why lentils are know as the poor man's meat. Lentils are a good source of dietary fiber, help lower your cholesterol, help to stable blood sugar, good for your heart, and high in iron, so eat your lentils!

This recipes is a morph of cornbread and beans and Indian lentil recipes. It super simple, and it just came together one day with leftover cornbread and a plain lentil soup.


corn bread and lentils, spicy
Your ingredients:
2 cups (390 grams) green lentils
1 carrot, sliced
3 - 4 garlic cloves , minced
1 bay leaf
1 beef bouillon cube
6 whole cloves
6 peppercorns
1 teaspoon(5ml) of paprika
1/2 teaspoon salt
1/2 teaspoon black pepper
1 or 2 dried/fresh hot chilies
3 cups (675 ml) water
1 Tablespoon(15 ml) oil

1. In a large pot warm the oil under medium heat, then add the sliced carrot and minced garlic, fry for about 5 minutes just until the garlic has cooked. Then add the bay leaf , peppercorns, whole cloves and chilies ( leave out for a non spicy version), you'll fry these for about 2 minutes, this brings out or release the flavors and scents of the spices. You'll smell the spiciness from the chili and peppercorns, and the intense scent of the cloves.
2. Have your water ready, next add the paprika, salt, bouillon and lentils. Stir to distribute all the spices and lentils. Now you can add your water to the pot, ( note for every cup of lentils you add one and half cups of water.)
3. Bring the lentils to boil over medium heat, then lower the heat and continue cooking until the lentils are soft. It depends on your taste if you want the lentils to have more of a soupy texture than you'll need to add more water. Check on them often to make sure they don't get to dry.


smoked hamThis recipe makes a hearty meal by serving the lentils with some smoked meat, smoked ham is what you see here, and corn bread. Or vegetarians can skip the meat and just enjoy with the cornbread.

*see cornbread recipe below*

Read more...

Simple Cornbread

corn bread
Cornbread is a common bread all over the Us, but I think it's most popular in the southern states. There are several ways to cook cornbread, on the stove with a skillet/pan, baking,or steaming it. You'll also find several variations some with buttermilk or milk, others with oil - butter or animal fats, some with corn kernels, others with added chunks of Jalapeno peppers.

When I think cornbread I think of beans, because of the delicious cornbread and beans dish. I also think lentils, spicy lentils. You can see my recipe for spicy lentils with cornbread(and smoked ham).
Today I'm sharing my simple cornbread recipe with plain milk, (when I have buttermilk I use it instead of plain milk.)

Your ingredients:
1 cup (120 grms) yellow cornmeal (I use coarse or grainy ground)
1 cup (120 grms) white flour
3/4 teaspoon (4ml) baking soda
1 teaspoon (5ml) baking powder
1/2 teaspoon(2ml) salt
1 teaspoon (5ml) sugar or honey
small pinch of black pepper
1 egg
2 Tablespoons(30 ml) vegetable oil or butter
1 cup (250ml) whole milk or buttermilk

1. preheat your oven to 350f /180c
2. combine all the dry ingredients in one bowl, and in another combine your wet ingredients. Then slowly add your wet ingredients to the dry until your batter has no lumps.
3. prepare you baking dish by first coating it with butter or oil, this makes it easier to remove the bread once it's cooked.
4. pour your batter into the baking dish and put in the oven. The bread will need to bake for about 20 to 25 minutes.

The bread comes out a golden yellow color, buttery and soft, slightly fluffy but crumbly at the same time. I use a coarser ground of cornmeal, so when I grab a piece I can feel the little grains of corn between my fingers. Of course if you don't like the grittiness you can use a finer cornmeal. This bread goes great with beans, but it's also fantastic warm with a little butter and or honey...mmmmh.


Read more...

Mexican Salsa ~ Salsa Fresca ~ Pico de Gallo

>> Sunday, July 5, 2009


Salsa means sauce in Spanish. Mexico is a very diverse country in which the many regions yield a big variety of dishes and salsas. Every family has their favorite recipes,their favorite type of salsas they like most, but one thing is for sure; in Mexican homes you will always find some sort of salsa on the table. It may be based mostly on chiles/ chilies dried or fresh( the choice of peppers alone is mind blowing), with our without tomatoes, fresh or the bottled kind, spicy or mild, used for botanas (appetizer), to top your tacos, or cooked with meats, the choices are many. Salsa is also a foundation for many dishes which can make something that is ordinary and bland and transform it to something that arouses your senses and tickles your taste buds. When cooking certain dishes, like a good mole, it is not uncommon to spend nearly all of the preparation time on getting the salsa just right. A good salsa doesn't have to be the spiciest thing you've ever eaten, and it definitely should not overpower your dish. It brings all your ingredients together and makes for a very happy dinning experience.

Being far from home I don't have access to all of those wonderful and vast variety of chiles, (Oh how I miss my Mom's salsa quemada, salsa verde, and mole.) But I still try to make salsas with the local ingredients and left over care package. The one I make most often is my Pico de Gallo*~Mexican Salsa~Salsa Fresca or Salsa bandera, what ever name you may now it by it's all the same burst of flavors that your taste buds will love. It's a fabulous thing to eat on a hot summer day with corn chips or to top your tacos, sopes, gorditas or burritos. The most important thing that you need is to have the freshest ingredients possible


Your ingredients:
4 medium ripe red tomatoes
1/2 medium onion
1 lemon or 1 lime
1 big handful of chopped cilantro
1/4 teaspoon black pepper
1/2 teaspoon salt
1/2 teaspoon garlic powder (and 1/2 teaspoon onion powder optional)
1 hot pepper (fresh jalapeno-serrano-I'm using a Dutch/Holland red pepper)
or 1 teaspoon of cayenne/ hot chili powder

You'll need a big bowl to combine your ingredients.
1.First you need to finely chop your onions,cilantro ,peppers and tomatoes. This is a really fast way to finely chop the onion and tomato, slice from top to bottom - going almost all the way through, then slice from side to side and finally turn it on its side and just slice.
3. After you have all your veggies finely chopped, squeeze in the lemon juice and mix. Then start adding your spices and keep stirring to mix all those yummy flavors. You can taste it to see if it needs any more salt.
That's all, you can let it sit for some minutes to let all the flavors combine or you can serve right away with corn chips or as a topping. The taste should be very fresh with a slight tanginess from the lemon and not be overpowered by spiciness, you should be able to taste all the ingredients complimenting each other.
If you don't eat spicy you can still enjoy this salsa, simply omit the pepper or chili powder, it doesn't hurt the salsa it's still mouth watering, ( in fact my mouth is watering now ). Gotta go make some more.
* pico de gallo can also be made with fruits instead *

Read more...

Buy or Sell Food Photos!

View My PortfolioRoyalty Free Images

Support Me By Clicking on These Links:

living in Czech Republic Expat Women - Helping Women Living OverseasTopOfBlogsBuy Foodie artHonest Cooking The Food Magazine, Spicie Foodie , contributor

Followers

©2009-2011 All recipes, articles, blog post, content, and images (*Unless otherwise stated*) are the sole property of Spicie Foodie and Nancy Lopez-McHugh. They should not be used without prior written consent. You can contact me here

  © Blogger template Webnolia by Ourblogtemplates.com 2009

Back to TOP