Happy Halloween ~ trick or treat pumpkin seeds

>> Thursday, October 29, 2009


Trick or Treat , Happy Halloween! Well no trick just a Halloween treat for you. Many of us are getting ready for Halloween by carving pumpkins, that means that there will be plenty of extra pumpkin seeds. This year instead of just throwing out the seeds I will be roasting them. I will be trying out and showing you 2 varieties or flavors to add to the seeds. The first is just a standard salt added to the seeds. The second was an experiment of using sugar, cinnamon, nutmeg and cardamom to spice the pumpkin seeds. how to roast pumpkin seeds

You will need:
pumpkin seeds, parchment paper, oil or melted butter (see note) , seasonings of your choice(optional) or salt

1. Preheat the oven at 225F / 121C , line a cookie sheet with parchment paper. After removing the seeds from the pumpkin rinse and clean off all the stringy bits of pumpkin.(note) If you are not using the parchment paper coat the cookie sheet with oil or melted butter. Using paper towels dry the seeds well or let them air dry.
2.Opting for a lower calorie version I did not use any oil nor butter. Instead I left the seeds a little bit damp so that the seasoning would stick to them. You can either season the seeds or leave them unseasoned. For one batch I put the seeds in a bowl added a little bit of sugar, cinnamon, a small pinch of nutmeg and cardamom, and tossed until the seeds were well coated. The second batch I tossed the seeds with a bit of salt.
3. Spread the seeds on the cookie sheet, try to have the seeds spread out evenly on one layer. Put in the preheated oven to toast. You can check on the seeds about 15 minutes into the toasting and with a wooden spoon move them around a bit. Roast for 30 minutes or until the seeds are brown and feel crispy.

pumpkin seeds with salt*seasoned with salt*pumpkin seeds with cinnamon*seasoned with spices*

Toasting pumpkin seeds is quite easy and fast and a great way to using up the seeds from your pumpkins. Trying this has convinced me not to throw out the seeds but instead enjoy them as a healthy snack. Both flavors were good, but adding the sugar and spices to the first batch made a nice sweet change on just regular pumpkin seeds. I think that you could really add any of your favorite spices to them, they are pretty versatile.

Read more...

Pumpkin Puree ~ preserving a little bit of autumn

>> Saturday, October 24, 2009

sugar pumpkin


Pumpkins, pumpkins every where I look! Halloween is right around the corner and the American Thanksgiving holiday is also soon to come, and many of us are getting ready for these two holidays by buying pumpkins. You already know what to do with your pumpkin on Halloween, make Jack-o'-lanterns, and Thanksgiving day means pumpkin pie. Many of us have already made pumpkin soups, bread, muffins, pies, all sorts of sweet and savory dishes. But how much pumpkin can you eat in a couple of months before getting pumpkined out? The dilemma - what to do with all the extra pumpkins we bought before we had our fill of pumpkin everything? Pureeing and preserving extra pumpkins is a great way of using up our lovely seasonal friends.
sliced pumpkin with seeds
But before I tell you how I do so, another question popped in my head, are all pumpkins edible? Apparently, yes they are. Mind you not all pumpkin varieties are equal in taste and texture. If you are unsure of the pumpkin, double check with the produce man to double check the correct pumpkin for your special cooking needs. These two sites are a great source of information on the taste and uses of many pumpkin varieties, "Pumpkin Nook" and "All about Pumpkins" .

The word Pumpkin originates from the Greek word pepon, which means large melon. Then the French changed pepon to pompom, which then was changed to pumpion by the British, which then was changed to pumpkin by American colonist. Though much different looking than the popular round species we find today, pumpkins are thought to have originated and first cultivated in the Americas. Native Indians from the America had many uses for pumpkins, using every part from the flowers to the seeds,flesh and shells. Pumpkins were woven into mats, used as a food source, and hollowed out to make bowls to eat off and to use as storage containers. Nowadays pumpkins are grown all over the world with many varieties to choose from.

Pumpkins are not only tasty and versatile in our kitchens, but are also great nutritious food. The bright orange varieties are loaded with beta-carotene and antioxidants. Pumpkins and their seeds are high in fiber, and (the seeds) are a good source of zinc and protein. Whole pumpkins have a high water content making them a low fat and low caloric fruit, (yes they are a fruit not a vegetable).

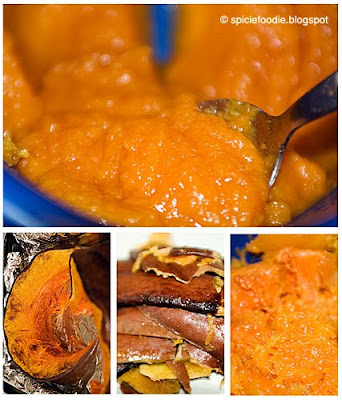
And now getting on to what to do with all those extra pumpkins. I choose to puree and freeze mine for the coming months. There are several ways to cook the pumpkin before pureeing it. Steaming, in a microwave, boiling, or my preferred method baking. The instructions below have been used on 3 types of pumpkins( sugar pumpkin, jack-o' -lantern, and Musque de Provence - Fairytale pumpkin) all with good results, and all for different recipe uses.
how to cook a whole pumpkin
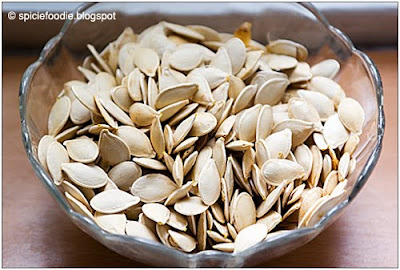
1. Preheat the oven to 200c or 392f . First wash your pumpkin thoroughly, place on a cutting board and carefully cut in half. Next remove the stringy center , set the seeds aside if you want to roast them, discard the stem. You can either leave the pumpkin in 2 halves or cut into smaller slices. Place the pumpkin halves/slices in a large baking dish. If you are just using 2 halve place them with the outer shell facing up, otherwise place slices on their sides.
2. Bake until the pumpkin is soft. Testing the pumpkin with a fork or knife to make sure it has cooked all the way through. If the pumpkin is still hard in the center but if the outer flesh is turning too dark, cover with aluminum foil and continue to cook until soft. Depending on the size and variety of your pumpkin it can take anywhere from 45 minutes to 1 1/2 hours or longer.
3. Once the pumpkin has softened all the way through, let it sit to cool down. (You can also place in the refrigerator to finish the following day.) Once the pumpkin is cooled down, using a spoon begin to scrap the flesh away from the outer shell. Do this over a large bowl or into a blender and throw out the outer shell. When you have finished with the whole pumpkin, put into a blender or with a hand held mixer blend until you have a smooth puree ( about 5 minutes. ) You could also use a potato masher and mash until you have a soft mixture.
baking a pumpkin
If you will be using the pumpkin puree within a couple of days just store in the refrigerator. I will be freezing all my puree. In freezer safe containers or in small plastic bags portion out the amounts of pumpkin puree your recipes typically call for, label and date. I have stored pumpkin puree in the freezer for up to 4-5 months, with no problems. Actually I have found pumpkin puree freezes quite well, with no harm to the taste or texture. So now you can enjoy your favorite pumpkin recipes year round!
preserving a pumpkin
And this is all the pumpkin you will have left over!!

Read more...

Orange Spritzer ~ a healthy low calorie non-alcoholic drink

>> Monday, October 19, 2009

orange spritzer
Spritzer (Spritzen) is a German word that means a spray or a splash. The word is better know as a reference to a drink, usually consisting of wine and carbonated (sparkling) water. The carbonated water is mixed with the wine to make a light, fizzy and refreshing drink that is very popular on hot summer days. I have heard of and have seen people mixing cola with their red wines. There are also other non-alcoholic versions, usually consisting of fruit and or vegetable juices.

I love wine, specially red wine, but I just can't bring myself to "ruin" a good wine by adding carbonated water. (I think my years in France have a lot to do with this feeling.) I don't drink soda because it's way to sugary and caloric for my taste. Instead I prefer to drink water,tea, and 100% fruit juices. But being that I'm not a fan of sugary drinks, I always mix my juices with sparkling water. The recipe I'm sharing with you today is for my favorite way of drinking orange juice, an orange spritzer!

non-alcoholic spritzerYour Ingredients:
100 % Orange juice
sparkling(carbonated)water
1 orange , for decoration -optional
ice cubes , optional

1. Take the orange and either slice it thinly or cut it into wedges. In a water pitcher mix equal parts orange juice and sparkling water, if you are using ice cubes you may want to add those first.
2. Serve with a slice or wedge of orange. Enjoy!


You want to serve this immediately, because the drink needs to be fizzy.This spritzer can be made with any of your favorite juice or combination of juices.

If you have kids this is a great drink to give them as an alternative to soda. They'll like the fizziness like a soda and it's sweet enough but not too sweet, mothers will love the fact that the drink is still very nutritious. Orange juice is very high in Vitamin C, which our bodies need to help heal wounds faster, for strong bones and teeth and to help fight off infections. Vitamin C is also great for our immune system, helping to make it strong. Cold and Flu season is here and we have all heard our Doctors and Mothers telling us to take our vitamin c for a cold. When you are selecting orange juice or any other juice it's very important to read the labels. You need to make sure that it's 100% orange juice without any added sugar. There are many juice brands out there that though say they are 100% juice, have a lot of sugar or fructose or sucrose added to them, avoid these.

sparkling orange juice

Read more...

The perfect hard boiled egg, every time!

>> Tuesday, October 13, 2009

egg holder
Today's post is a back to basics cooking lesson, How to boil an egg. The perfect boiled or hard boiled egg is when the egg is cooked all the way through and the yolk is golden , there shouldn't be a grey/green ring around the yolk. To me if a hard boiled egg has that grayish or green tone, it becomes very unappetizing. (I can picture it, grayish yolk chunks in egg salad ,,,yuck ). I think eggs are one of those foods that seem like a fairly easy to cook food, but some how can turn into a difficult food to master. Many people have problems with either over or under cooking eggs and can quickly go from delicious to disgusting. This is a fool proof method and if you try it your hard boiled eggs will come out perfect.


golden egg yolk
1. Utensils you will need are a large pot, a slotted spoon, and a large bowl. You will also need cold water and of course fresh eggs. First place the eggs in a large pot and pour cold tap water into the pot, the water should cover all the eggs by about 1 inch / or 2.5 cm. Place the pot over high heat until the water has reached a rolling boil. This means that the water is bubbling vigorously. Then immediately lower the heat to a medium low setting, and continue to boil for an additional 10 minutes.

how to boil an egg

2. A minute before the 10 minutes are up, fill half way a large bowl with very cold- ice cold water. Using the slotted spoon gently place the eggs in the bowl with very cold water, making sure that all the eggs are covered.

cooling eggs

3. Leave the eggs in the cold water until they are at room temperature. This is a very important step because this cooling down is what prevents the yolk from turning grey/green.

huevo hervido

Look the yolks are perfectly cooked and are a beautiful golden yellow color!! :)


deviled eggs,egg salad

I have been making hard boiled eggs this way for years and it's always a success. Now you are ready to enjoy these hard boiled eggs with a little salt and pepper,slice them to use on sandwiches, and these are also perfect to for deviled eggs or egg salad. (I will post my recipes and photos for both soon.) Now if I could only master poaching an egg ...

Read more...

Malaysian Chicken Curry Puffs, and a new cookbook

>> Sunday, October 4, 2009

Malaysian snacksMalaysian chicken curry puffs a first in my kitchen, and a dish that has become a favorite and one that I will cook frequently . Malaysian cuisine is one that has been on my checklist to learn and cook. I am not really sure why I didn't try it sooner, but thanks to our friend (aka frequent dinner guest :) ) it moved up on my foods to cook very quickly. While on a trip to Malaysia he picked me up a wonderful cook book. It is called "The Food Of Malaysia" and I love it! There are so many dishes to try and I've already made a few.


Normally when I cook I cook by feeling and don't follow specific instructions. When it's something completely new to me I usually research the dish to get a general idea of what ingredients go into it. Then I cook it my way, adjusting to my likes and wants to make it my own. But since I'm making these for the very first time I will follow the instructions in the cookbook. Below is the recipe as found in the cook book.

chicken curry puff pasty

Your ingredients: makes 40 pieces
For the filling~
5 tbsp. (75 ml) S oil
1 medium onion
1 tbsp. (10 ml) grated ginger
3 1/2 tsp (17 ml ) meat curry powder
1/2 tsp (2 ml) chili powder
1/2 tsp (2 ml) turmeric powder
2 large potatoes ( 500 grams / 1lb ) peeled,boiled and diced
2 tsp (10 ml )sugar
1/2 tsp (2 ml) black pepper
1 tsp salt
2 cups chicken meat (400 grams / 14 oz) or 2 large chicken breast, cooked and diced
1/4 cup (60 ml) water

Pastry ingredients:
3 1/2 cups (500 grams ) flour
150 grams (5 oz) butter or shortening
3/4 cup + 4 tsp (200 ml) water
1/2 tsp (2 ml) salt

1. In a skillet gently fry the onion and ginger until onion is golden brown. Next add the curry,chili and turmeric and fry for 3 minutes or until fragrant. Next add the potatoes,sugar,peeper and salt and cook for 10 minutes. Then add the chicken and water and cook until mixture is almost dry. Remove from heat and set aside to cool.
2. Knead the pastry into a smooth dough, cover and set aside in a warm place for 30 minutes. Dividing the dough into 2 halves, roll each half on a floured surface to a 3 mm (1/8 in) thick. With a cookie cutter cut into the dough, 10 cm ( 4 in) circles in diameter. Fill center of each circular dough with 1 tbsp (15 ml) of chicken filling, fold in half and crimp and roll edges to form a simple wave pattern. Make sure the pouch is well sealed. Repeat until all the dough has been used.
3. Deep fry each puff until it is lightly golden brown on both sides, or you can bake them at 180 c (350f) for 30 minutes or until lightly golden. Serve hot or at room temperature, with a spicy chili sauce.

curry puff**
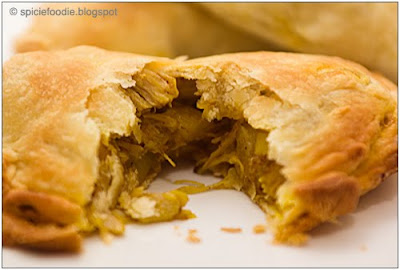
Notes,I used commercially prepared pastry dough and baked the pastries instead of frying, this worked just fine. The pastries were flaky and absolutely delicious! I also made only half a recipe and cut the pastry into a bit bigger circles to serve as a main dish for dinner.
Next is the recipe for the chili sauce that was served to top the puffs. It was so good and added another unique taste.

Ginger Chili Sauce:
4 red chillies, sliced
3 cm (1 1/4 in) ginger,sliced
3 cloves of garlic
5 tbsp (75 ml) water
1 1/2 tbsp (22 ml) sugar
1 1/2 tbsp ( 22 ml)lime juice
1 tsp salt
1/2 tsp sesame oil (vegetable oil)
1. Grind all ingredients together in a mortar or in a blender. This sauce will keep in the refrigerator for 1 week. Enjoy!

These delicious puff pastries are so good and so easy to make. I did a little research and learned that they are a favorite Malaysian in-between meals snacks that were originally created by Indian cooks. They are apparently so popular that they are found everywhere and enjoyed at all hours of the day.

Read more...

Malaysian Meat Curry Powder

>> Friday, October 2, 2009


Today I'm posting a curry powder recipe that you will need for the next recipe I will be posting. It is Malaysian meat curry powder, and a new curry powder in my spice shelf. Malaysian cuisine is new to my dinner table, but it's one that I have been curious about. Having never made Malaysian curry I need to do a Google search on what spices go into this meat curry powder. The recipe below comes from Rouxbe, an online cooking school. It is an excellent site that features delicious recipes and instruction videos. They also offer memberships to access more learning material.

Your ingredients:
10 whole cloves
10 whole black
peppercorns
4 whole cardamom pods
1 cinnamon stick (about
2-inches/5 cm)
4 whole dried red chilies
4 tbsp coriander seeds
2 tbsp cumin seeds
1 tsp fennel seeds
1 tsp turmeric


1. First we will be toasting the spices, Rouxbe suggest to do it according to size,because the spices will toast at different rates. In a pan with medium heat add the cloves, cardamom and peppercorns. Toss a few times, and as soon as they begin to smoke and release their fragrance, set them aside to cool. Next toast the cinnamon stick and dried chilies, then toast the coriander seeds. And last we will toast the cumin and fennel seeds together.

2. Once the spices have cooled down, you can either grind them in a spice grinder or in a pestle and mortar. Grind all the spices except the turmeric, reserve it for the last minute. Grind until you have a fine powder or until you get the desired graininess you want. ( I leave mine a little grainy, but that's my personal choice.) Now you can add and mix the turmeric powder with all the other spices.


Read more...

September DMBLGIT Winner! Originality Category

>> Thursday, October 1, 2009


My first award! Last month I entered one of my photos for the September 2009 Edition of DMBLGIT (Does My Blog Look Good In This? ) contest, that was being hosted by Michelle of Brown Eyed Baker, and I was among the winners. My photos (below) was the winner for the Originality Category. There were some amazing entries and it's quite an honor to have been chosen from all of those lovely photos.

salt, sea and table salt,photo of salt,cooking with salt
This award is a monthly event held by Andrew of Spittoonextra, and per his site here is a little background information about DMBLGIT, " Does My Blog Look Good In This (DMBLGIT) is a monthly food photography event, called by some as "the grandest foodporn event available" on the web. It is open to all bloggers who have posted a photograph with a food or drink connection. Each monthly round is hosted by a different blogger. Food bloggers submit their best photos from posts they completed during the previous month which are then judged and scored. Winners are made covering three categories (edibility, aesthetics, and originality) plus three overall winners. Each month, a new contest starts, hosted on a different food blogger's site. "

Next months' or October's contest is being held by hosted Astrid from Paulchen’s Foodblog. Maybe you'll enter this month?

Read more...

Buy or Sell Food Photos!

View My PortfolioRoyalty Free Images

Support Me By Clicking on These Links:

living in Czech Republic Expat Women - Helping Women Living OverseasTopOfBlogsBuy Foodie artHonest Cooking The Food Magazine, Spicie Foodie , contributor

Followers

©2009-2011 All recipes, articles, blog post, content, and images (*Unless otherwise stated*) are the sole property of Spicie Foodie and Nancy Lopez-McHugh. They should not be used without prior written consent. You can contact me here

  © Blogger template Webnolia by Ourblogtemplates.com 2009

Back to TOP